


The first thing you need, before you begin your shed build, is a firm and level base. Without this, you may struggle to build your shed as the edges, frames and screw holes won’t line up properly.
There are lots of different types of shed base, but most people opt for concrete over timber or plastic options, as it offers more strength and resilience.
Remember that concrete can’t be poured directly onto soft ground, so you will need a compacted sub-base of hardcore to be installed first.
Other considerations before you begin:
- Most sheds are classed as temporary structures, and aren’t very big, so it’s unlikely you’ll need planning permission. However, it’s always best to check with your local planning department as your home may have other rules applied or may be in a conservation area.
- Choose the location carefully; if you build your shed too close to your house or a fence, you’ll struggle to paint and treat it.
- If you plan on using electricity in your shed speak to a certified electrician first to ensure they can place a safe electricity supply in your chosen location.
Step 1: Laying the Formwork
You’ll need to build a timber frame onto your prepared sub-base, known as formwork, to support the wet concrete as it cures.
To do this, you’ll need:
- A hammer, saw and nails
- A builder’s line, or string and wooden pegs (50 x 50mm timber)
- 25mm thick timber planks (as wide as the depth of concrete)
- Long spirit level and a builder’s square to ensure a square and even surface
How to build your formwork:
- Lay out your frame using a builder’s lines and eight wooden pegs. Hammer a sharpened peg into each corner of the peg and connect them using taut string to draw the outline of your base.
- Use a builder’s square to ensure the corners are exactly 90º.
- Saw the timber planks to the required length and position them along the sides of the frame.
- Ensure they are straight with a spirit level and nail to the the wooden pegs at each end.
- Hammer in additional pegs at about 1 meter intervals along the outside of the timber frame for extra support.
Step 2: Laying the Concrete
Concrete begins to cure, or set, within just a few hours of being mixed, so you’ll need to pour and level it quite quickly. You should be able to walk on the concrete three days after pouring, but the formwork should stay in place for five days. If you’re in a hurry, speak to us about additives that can speed up the curing process.
To do this, you’ll need:
- Safety equipment – goggles, gloves, rubber boots and long sleeves & trousers
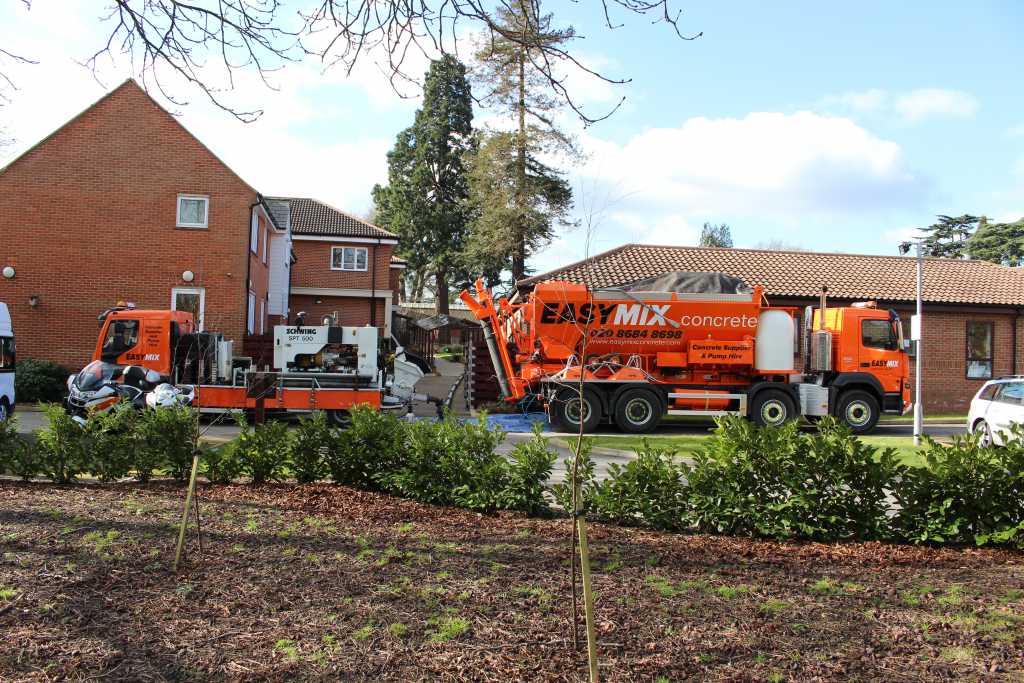
- Concrete – EasyMix can provide volumetric concrete, mixed on site to meet your requirements
- Wheelbarrows and labourers or a boom or ground line pump to transport the concrete to site
- A length of timber longer than the width of your shed base
- Rake, trowel, shovel – to assist with spreading the concrete
- Polythene sheet and a crowbar
How to lay your concrete:
- Estimate the amount of concrete by multiplying the length of the base by the width and then multiplying that figure by the depth of the concrete. Or just use the EasyMix Concrete Calculator.
- Call the team at EasyMix to discuss your project and order your concrete delivery. We can arrange a delivery at any time to suit you and offer 2 hour time slots so you aren’t waiting around all day.
- When your delivery arrives, the EasyMix team will either set up the pipes to pump the concrete to the required location, or they will pour the concrete from the truck’s chute into wheelbarrows for you to transport yourself.
- Begin to pour the concrete into the furthest corner of the formwork and use a rake or shovel to evenly spread the concrete. It should overflow the formwork by a few centimeters.
- Compact the concrete by using a tamping board (length of timber longer than the width of your shed base). With a person at each end of the board, move it up and down the concrete base, lifting and lowering to level the surface to the sides of the formwork.
- Then slide the tamping board backwards and forwards in a sawing motion across the base to remove any excess concrete.
- Once complete run an edging trowel along the sides of the formwork to smooth the edges and reduce the chances of it chipping.
- Place a polythene sheet over the surface while it cures to protect it. Allow the concrete time to properly cure and harden before removing the formwork (You might need a crowbar to help with this bit!) and building your shed.
Here at EasyMix, we specialise in providing assistance for DIY projects and have a team on hand to help ensure you get the right product at the right price. If you’re unsure about the type of concrete you require, or how to get the best results from it, simply give us a call to find out more.