


Underfloor heating installation has numerous benefits: you can walk around your home in winter with no socks, room layouts are more flexible with fewer radiators and – a little-known fact: it can actually be a cost-effective way of heating your home. It synergises well with renewable energy sources too, so if you’re trying to create a more sustainable living space, underfloor heating is definitely something worth checking out.
To help give you an idea of what it would be like to have underfloor heating installed in your home, we will be breaking down the process for you right here.
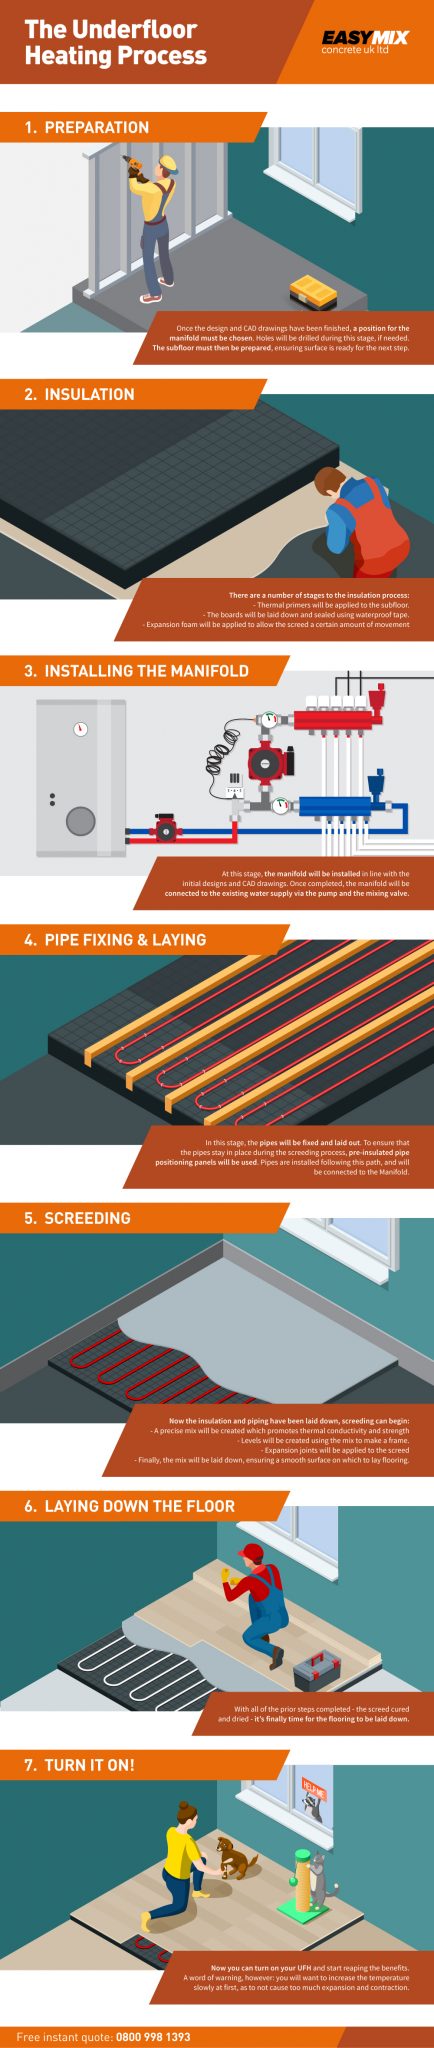
Step 1 – Underfloor heating preparation
Once the design and CAD drawings have been finished, a position for the manifold must be chosen. Depending on the scope of the project – that is, whether it’s a single-room or multi-room system – the manifold may either be in the room in which the underfloor heating installation is taking place, or in a more central location in the home.
If the designers suggest running pipes through walls, holes will be drilled during this stage. The subfloor must be prepared too; this means sweeping, sanding and generally ensuring the surface is ready for the insulation to be laid.
Step 2 – Underfloor heating insulation
There are a number of stages to the insulation process:
- Thermal primers will be applied to the subfloor. This serves to further insulate the floor as well as seal the concrete ready for the adhesive.
- Following this, the boards will be laid down and sealed using waterproof tape.
- Finally, expansion foam will be applied to allow the screed a certain amount of movement, this is vital for when the floor is being heated.
Step 3 – Installing the manifold
At this stage, the manifold will be installed in line with the initial designs and CAD drawings. Once completed, the manifold will be connected to the existing water supply via the pump and the mixing valve.
Step 4 – Pipe fixing and laying
In this stage, the pipes will be fixed and laid out. To ensure that the pipes stay in place during the screeding process, pre-insulated pipe positioning panels will be used.
Following this, the pipes will be installed following the path laid out by the positioning panels.
Finally, once the piping has been completely laid out, it can now be connected to the manifold.
Step 5 – Screeding
Now the insulation and piping have been laid down, screeding can begin. The screeding process is as follows:
- A precise mix will be created which promotes thermal conductivity and strength, without sacrificing too much drying time.
- Levels will be created using the mix to make a frame.
- Given that underfloor heating can cause materials within the floor to expand and contract considerably, expansion joints will be applied to the screed, mitigating the problem.
- Finally, the mix will be laid down, ensuring a smooth surface on which to lay flooring.
Step 6 – Laying down the floor
With all of the prior steps completed – the screed cured and dried – it’s finally time for the flooring to be laid down.
Step 7 – Turning your underfloor heating on!
Now your underfloor heating installation has been completed, you can turn it on and start reaping the benefits. A word of warning, however: you will want to increase the temperature slowly at first, as to not cause too much expansion and contraction.
Here at EasyMix Concrete we offer premier screed and concrete floor laying services. Simply contact our professional team today to find out how our screed can be utilised in combination with underfloor heating.